A first-year medical student can recognize the heart, liver, and femur in isolation yet still feel lost in the donor laboratory. The difficulty usually isn't a lack of effort. It comes from trying to identify structures before learning the language that tells the learner where each structure is, what it is next to, and how a view has been rotated or sectioned.
The anatomy of the human body becomes more manageable when learners begin with orientation. Anatomical position, directional terms, sectional planes, body cavities, and the relationship between regions and organ systems provide the framework for reading a body, an atlas, a computed tomography (CT) image, or an examination vignette.
Why Anatomy Starts Before You Memorize a Single Bone
During a first laboratory session, a student may identify a femur in a textbook and still hesitate beside a donor. The body presents layers, neighboring tissues, connective planes, and structures that cross regional boundaries. A muscle's name offers little help if you cannot tell whether it lies in front of or behind a vessel, or whether the specimen is being viewed from the patient's perspective.
This difficulty reflects a language problem before it becomes a memory problem. Anatomy uses a shared set of reference rules, much like a map uses a compass, grid, scale, and legend. Without those rules, familiar names become isolated labels. With them, each label gains a position and a relationship.
The next two sections introduce the framework in manageable pieces. Anatomical position supplies the fixed point of reference. Directional terms describe relationships between structures. Planes explain how dissection images, illustrations, and scans divide or display the body. Later, the distinction between regions and organ systems will show why the thorax and the cardiovascular system describe the same body from different angles. These are previews, not definitions to memorize all at once.
A useful learning sequence is simple: establish the reference, identify the view, locate the region, then connect the structure to its neighbors and system. That sequence prevents a common mistake, such as treating the abdomen as if it were another name for the stomach. It also gives the same method to bones, muscles, nerves, vessels, and viscera.
Use three quick checks as you study. Can you state whose right or left you are identifying? Can you recognize the viewing plane before naming a structure? Can you separate a location label from a functional system label? If one answer is uncertain, return to orientation rather than adding another memorized term.
The body's organization also explains why position matters. Cells form tissues, tissues form organs, and organs cooperate in systems. Encyclopaedia Britannica explains the structural organization of the human body. A structure therefore becomes easier to understand when its name, location, tissue relationships, and function are learned together. Orientation gives those facts a place to stay.
Anatomical Position and the Language of Direction
During your first anatomy lab, a partner may lie on the table while you identify a structure from the foot of the room. Your first task is not to memorize its name. Establish the reference point. Anatomical position places the body standing upright, facing forward, with the arms at the sides, palms facing forward, and feet flat and slightly apart. Directional terms still use this posture when the patient is lying down, viewed from behind, or shown in an image.
Use the patient as the fixed reference, like a person seated in the front-center of a classroom. You may move around the room, but the patient's right remains the patient's right. In an anterior view, that side appears on your left, which is why orientation must come before description.
The compass terms
- Superior and inferior indicate position toward the head or feet. The nose is superior to the mouth, while the stomach is inferior to the heart.
- Anterior and posterior identify the front and back. The sternum is anterior to the heart, and the vertebral column is posterior to it.
- Medial and lateral describe distance from the body's midline. The nose is medial to the eyes, while the ears are lateral to them. These terms describe side-to-side relationships, not vertical position.
- Proximal and distal apply mainly to limbs and branching structures. The elbow is proximal to the wrist, while the fingers are distal to the wrist.
- Superficial and deep describe relative depth. The skin is superficial to skeletal muscle, while a vessel beneath those tissues is deep.
A clinical description becomes clearer when you combine terms. A laceration on the lateral forearm is farther from the midline than one on the medial forearm. A mass medial to a kidney lies closer to the body's midline than the kidney. This vocabulary replaces vague descriptions such as “near the side” with relationships another clinician can reproduce.
Test the vocabulary actively with this anatomical terms and directions guide: cover the definitions, then describe the relationship between two structures on a frontal chest image using only directional terms. You should be able to call a nerve posterior to an artery, a muscle deep to the skin, and a thumb lateral to the index finger without changing the reference system. OpenStax presents these foundational relationships in its anatomical terminology chapter.
Planes of the Body and the Cavities Inside Them
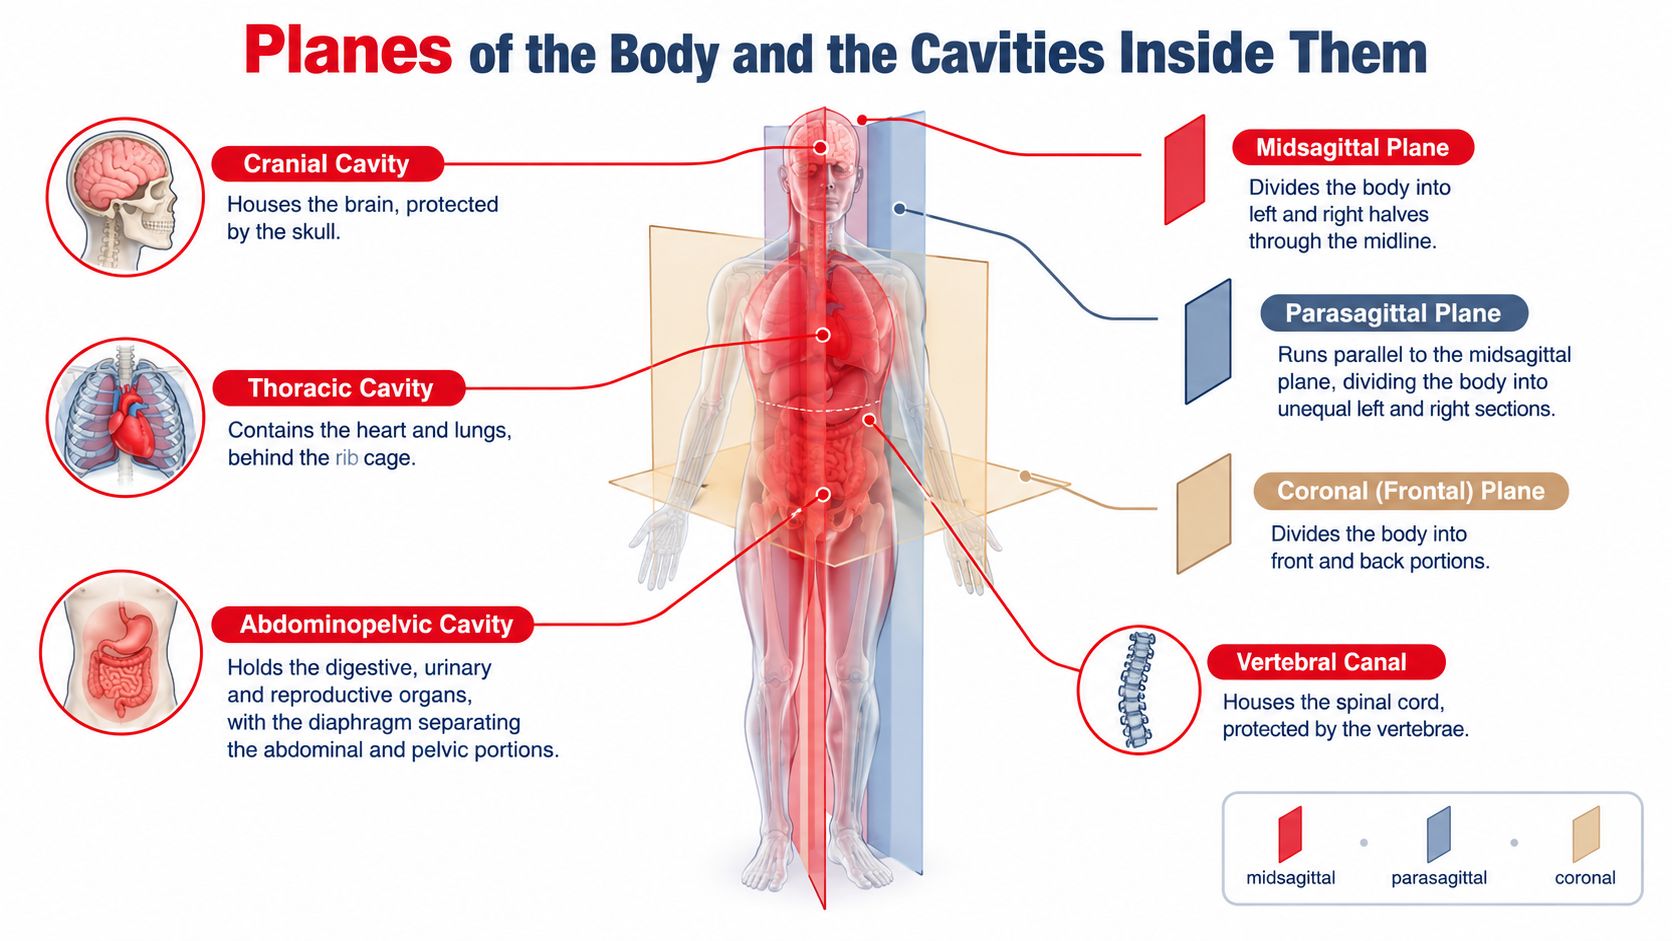
A plane is an imagined flat surface that divides the body. The midsagittal plane passes through the midline and divides the body into left and right portions. A parasagittal plane runs parallel to the midsagittal plane but does not pass directly through the midline.
The coronal, or frontal, plane divides anterior from posterior. The transverse, or horizontal, plane divides superior from inferior. Standard axial CT images correspond to transverse sections, although the displayed orientation still requires careful attention to the patient's right and left.
A house with connected compartments
The body can be pictured as a house with stacked spaces. The thorax occupies the upper living area, the abdomen lies below it, and the pelvis forms a lower compartment. The analogy isn't perfect, but it helps learners understand why a section can show several organs at once and why organs don't behave like isolated rooms.
The dorsal body cavity contains the cranial cavity, which houses the brain, and the vertebral canal, which houses the spinal cord. The ventral body cavity is larger and is divided by the diaphragm into the thoracic cavity and the abdominopelvic cavity.
Within the thorax, the pleural cavities surround the lungs, the pericardial cavity surrounds the heart, and the mediastinum occupies the central region between the lungs. These spaces may be real or potential spaces, depending on the anatomical compartment and its normal state. The pleural cavity, in particular, should not be imagined as an ordinary air-filled chamber.
Understanding planes matters because the same body can look radically different after rotation or sectioning. A learner who identifies the plane first has a better chance of recognizing whether a circular structure is a vessel, airway, or organ seen in cross-section.
The anatomy and physiology resource offers a related way to connect structural terminology with functional reasoning.
Regions and Organ Systems How the Two Maps Overlap
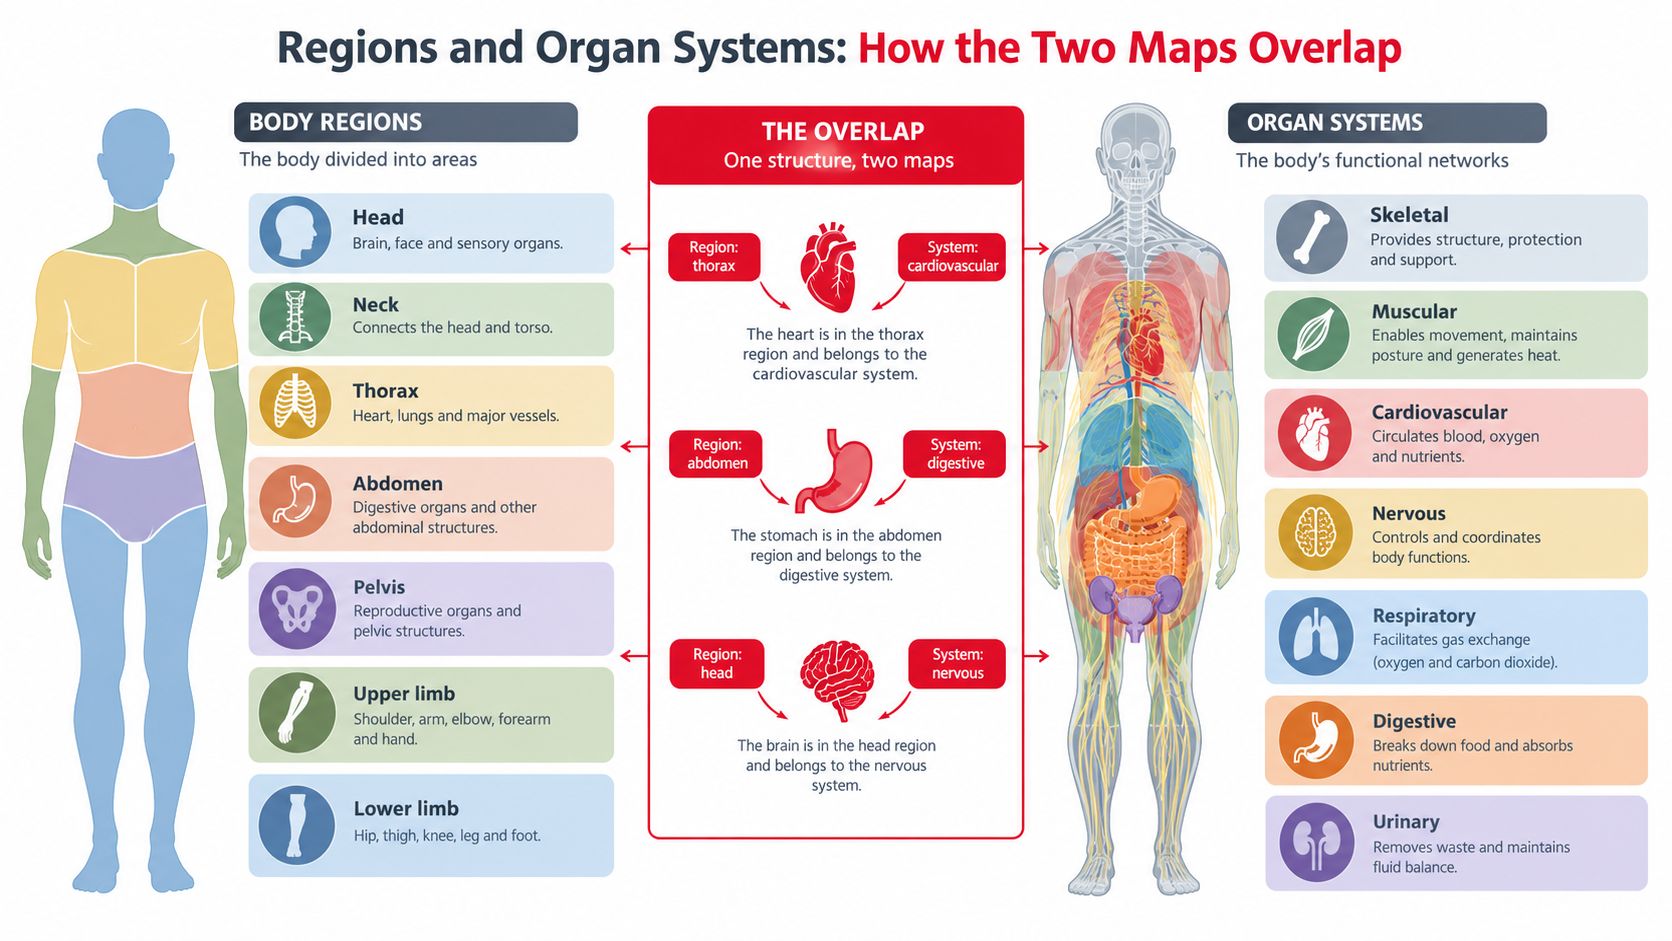
Regional anatomy divides the body by location. Common regions include the head, neck, thorax, abdomen, pelvis, upper limb, and lower limb. Systemic anatomy divides the same body by function, including the skeletal, muscular, cardiovascular, nervous, respiratory, digestive, urinary, reproductive, endocrine, integumentary, and lymphatic systems.
Neither map replaces the other. The regional map answers, “Where is the structure?” The systemic map answers, “What coordinated job does the structure perform?”
One body, two useful views
| Structure or pathway | Regional description | Systemic relationship |
|---|---|---|
| Heart | Thorax, within the mediastinum | Cardiovascular system |
| Stomach | Abdomen | Digestive system |
| Kidney | Posterior abdomen | Urinary system |
| Trachea | Neck and thorax | Respiratory system |
| Femur | Lower limb | Skeletal and muscular relationships |
| Spinal cord | Vertebral canal | Nervous system |
The diaphragm illustrates why regional borders shouldn't be treated as walls. It separates the thoracic and abdominal regions, yet the esophagus, aorta, and vagus nerve pass through or across this boundary. Their pathways belong to broader systems that continue from one region into another.
The stomach is another useful correction. The abdomen is a region, while the stomach is an organ within that region. The terms are related, but they aren't interchangeable. Similar reasoning prevents confusion between the thorax and the heart, or between the pelvis and the bladder.
A durable organ map
For any new structure, learners can record four facts:
- Region: Where is it located?
- Neighbors: What lies anterior, posterior, medial, lateral, superior, or inferior to it?
- System: What larger functional network includes it?
- Course: Does it cross a regional boundary?
This combined map helps predict relationships before every detail has been memorized. It also gives anatomy a clinical direction. A structure's neighbors influence which symptoms might appear when it enlarges, becomes inflamed, or is compressed. The endocrine system study guide provides one example of how a system-based lens can organize structures that occupy different regions.
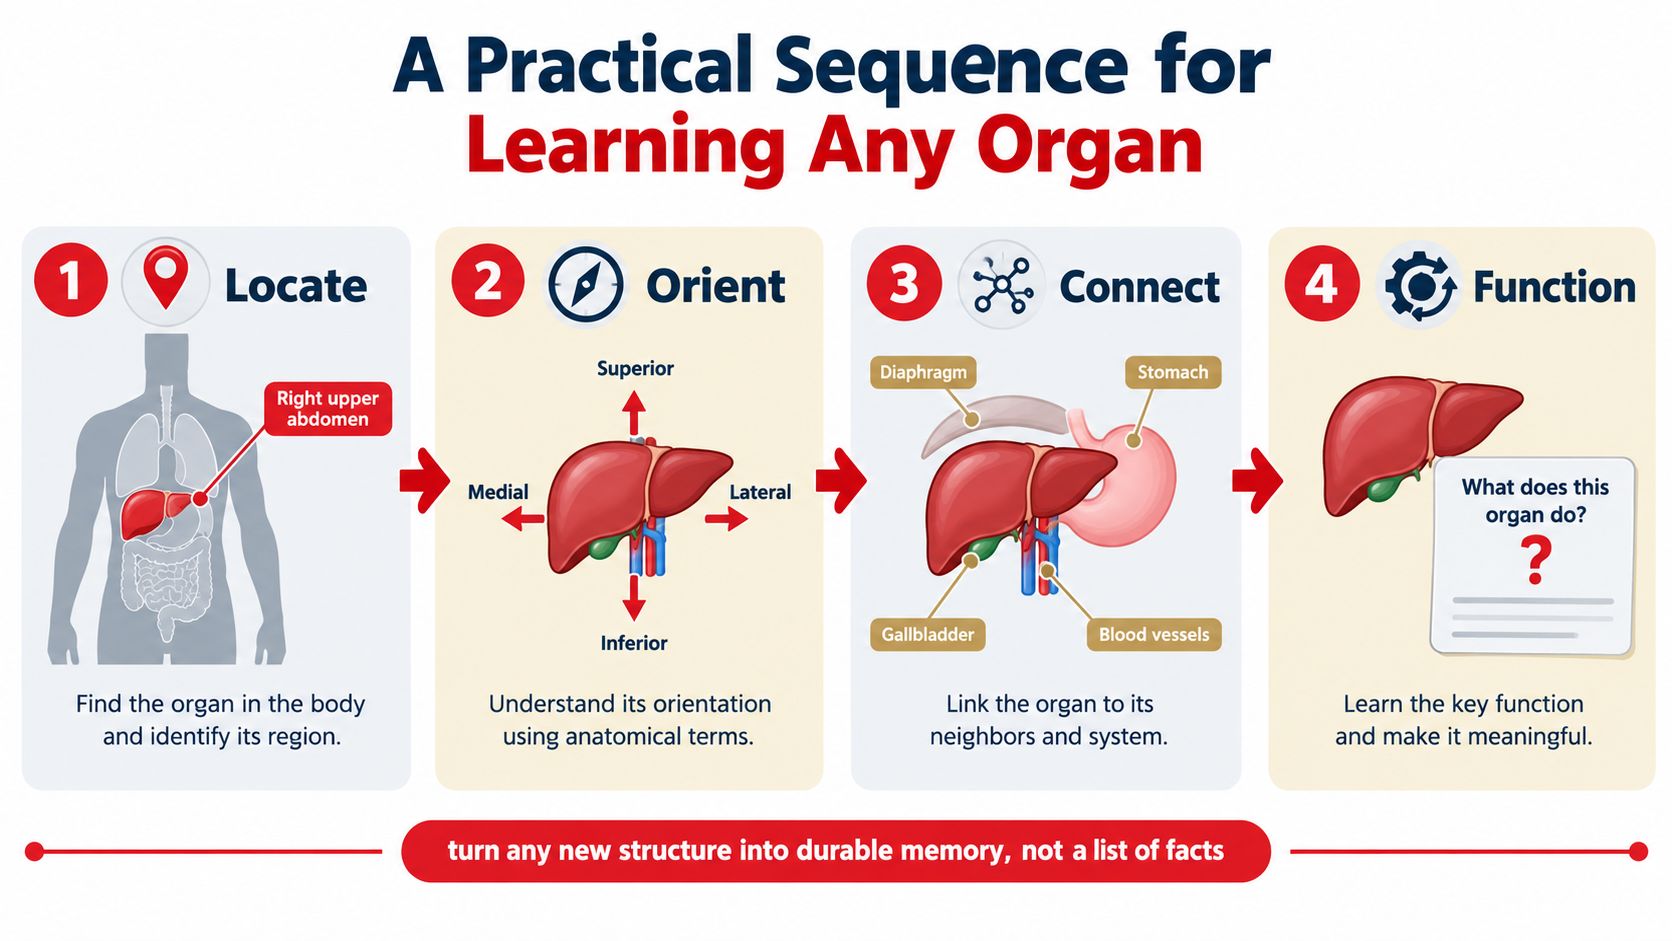
A Practical Sequence for Learning Any Organ
A useful organ study sequence moves from location to relationships, then from structure to function. It shouldn't be presented as a proven method from any single tutoring program. It is a practical framework that gives learners a repeatable order when a new organ feels like a disconnected list of facts.
Locate and orient
Begin with the organ in anatomical position. Identify its region, boundaries, surface features, and relationships to surrounding viscera, fascia, or serous membranes. For an abdominal organ, the sequence should establish the patient's right and left, identify the abdomen in relation to the thorax and pelvis, and then locate the organ relative to its neighbors.
Next, describe the organ's orientation. A learner might record which surface is anterior, which pole is superior, and which border is medial. This step prevents an atlas image from becoming a collection of labels with no spatial meaning.
Connect pathways to function
Trace the arterial supply, venous drainage, lymphatic drainage, and innervation. These pathways aren't decorative details. They help learners reason through why a lesion might produce a particular pattern of pain, sensory change, bleeding, or dysfunction. That is an examination framework, not a substitute for real-world clinical assessment.
Then connect microscopic structure to gross function. Alveoli, for example, have an extremely thin exchange surface that supports movement of gases between air and blood. Form answers the question “How can this structure perform its job?”
Add one clinical question
Consider the appendix. A learner can begin by locating it in the abdomen, then identify its relationship to the cecum, follow its arterial and lymphatic connections, and ask why inflammation can produce pain that changes location. The point is not to memorize a clinical script. The point is to connect anatomy with a simple question about how a structural change might affect sensation or neighboring tissues.
The same template can be applied to the stomach, kidney, or heart. A concise study card might read:
- Locate: region and boundaries
- Orient: surfaces, poles, and neighbors
- Connect: vessels, nerves, lymphatics, and system
- Function: structure-function relationship and one clinical prompt
This order resembles the way integrative anatomy questions are built. The learner must identify a structure, place it in space, connect it to a pathway, and then reason from anatomy to function.
Tracing the Respiratory System From Airway to Alveolus
A breath can be followed like a route on an anatomical map. Air enters through the nasal or oral cavity, passes through the pharynx and larynx, travels down the trachea, and reaches the primary bronchi. This sequence gives each structure a place and a direction before detailed memorization begins.
The epiglottis helps keep swallowed material away from the laryngeal opening. The vocal folds contribute to sound production and help protect the airway. From the trachea, branching continues through the primary bronchi, smaller bronchi, bronchioles, respiratory bronchioles, alveolar ducts, and finally alveoli. The branches resemble a tree, with larger conducting passages dividing into progressively smaller routes.
Conducting structures and exchange structures
The conducting portion moves and conditions air. Cartilage becomes less prominent as the branches narrow, while smooth muscle contributes more to changes in airway caliber. The exchange region begins where airway walls contain alveoli, allowing oxygen and carbon dioxide to move between air and blood.
Keep two processes separate. Ventilation is the movement of air through the airways. Gas exchange occurs across the respiratory surface. Tracing the route from the trachea to the alveoli makes the distinction easier to recall.
The diaphragm changes thoracic volume during quiet breathing. When it contracts during inspiration, thoracic volume increases and alveolar pressure falls below atmospheric pressure. Quiet expiration depends largely on elastic recoil, as described in OpenStax's explanation of the breathing process.
The pleural cavity is a potential space associated with the lungs and their surrounding membranes. It is not normally an air-filled chamber. If air enters it, the relationship between the lung and thoracic wall changes, illustrating why accurate cavity language matters in anatomy.
For broader clinical context, consult PatientNotes' pulmonology specialty page. To practice linking thoracic orientation with projected anatomy, use this chest X-ray interpretation guide.
Three Quick Self Checks to Confirm Orientation
These exercises can be completed before moving into detailed system study. They test whether the learner can use orientation rules rather than recognize familiar labels.
Self-check one, patient sidedness
Draw a frontal head silhouette and mark the patient's right eye. In an anterior view, it appears on the viewer's left. Add the chin and ears, then label the chin as inferior to the nose and the ears as lateral to the eyes.
Answer key: The patient's right is opposite the viewer's left in a frontal view. The chin is inferior to the nose, and each ear is lateral to the corresponding eye because each lies farther from the midline.
Self-check two, sectional planes
Review three unlabeled CT slices. Identify one as sagittal, one as coronal, and one as transverse.
Answer key: A sagittal slice shows a left-right division, a coronal slice shows an anterior-posterior division, and a transverse slice shows a superior-inferior division. A near-symmetric image isn't automatically coronal. The learner must identify which direction the section separates.
Self-check three, regions and systems
Map the heart, liver, kidney, lung, spleen, and bladder to a primary region and an organ system. Flag any structure or pathway that extends beyond one region, such as the trachea crossing from the neck into the thorax.
Answer key: The heart and lungs belong primarily to the thorax, the liver and spleen to the abdomen, the kidneys to the posterior abdomen, and the bladder to the pelvis. The heart belongs to the cardiovascular system, the lungs to the respiratory system, the liver and spleen to different system relationships, the kidneys to the urinary system, and the bladder to the urinary system. The trachea demonstrates why a regional description may change along a structure's course.
A learner is ready to progress when all patient right and left labels are correct, at least two of the three planes are named accurately, and at least five of the six organs are mapped correctly with a reasonable explanation.
Building Your Study Plan and Next Steps
A progressive-reveal plan keeps recognition from becoming passive. The learner first works from an unlabeled outline, then adds labels, and finally applies function and clinical prompts.
Three layers of recall
Layer one uses blank regional outlines. The learner sketches bones, organs, and major vessels from memory before consulting an atlas. This exposes gaps that a fully labeled diagram can conceal.
Layer two overlays labels and reverses the direction of recall. A structure should be identified from its position, named from a label, and connected to a basic function. Both directions matter because examinations may present a structure first or provide a name first.
Layer three adds clinical prompts. The learner asks which vessel could be affected by a fracture, which nerve could be compressed at a named site, or why an organ's position matters to a symptom pattern. These prompts should remain educational and hypothetical, not substitutes for clinical decision-making.
Terminologia Anatomica can support standardized terminology. A Netter or Gray's atlas can provide diagrammatic reference, while a carefully selected dissection video series can reinforce depth and spatial relationships. The learner should compare resources for clarity, labeling accuracy, and compatibility with the course curriculum rather than assume that one resource suits every need.
A manageable weekly cadence can include two hours of regional sketching, one hour of spaced-retrieval flashcards, and one hour of clinical-correlation questions. At the end of the week, the learner should group errors by type: sidedness, plane recognition, directional language, regional mapping, or structure-function reasoning. That error log is more useful than just recording a total number correct.
The human anatomy study guide can be used alongside official course materials and independent practice. Ace Med Boards offers one-on-one tutoring for relevant board preparation and a free Board Score Audit consultation, where an advisor can discuss areas of weakness and possible review resources without treating an early difficulty as a judgment on a medical career.
Sources
- OpenStax, Anatomical Terminology
- OpenStax, The Process of Breathing
- Encyclopaedia Britannica, Human Body
Ace Med Boards provides personalized one-on-one tutoring for USMLE, COMLEX-USA, and selected Shelf exam preparation, including anatomy-focused review and question analysis. Learners who want a diagnostic conversation about orientation gaps and board-study needs can visit Ace Med Boards to schedule a free Board Score Audit consultation.