Learning to read an abdominal CT scan really comes down to two things: getting the fundamentals right and sticking to a systematic search pattern. You have to learn the language of imaging first—understanding what the different shades of gray mean and why timing is everything—before you can start spotting pathology with any real confidence.
This means getting comfortable with tissue densities and knowing which contrast phase is going to light up the specific organ or disease process you're looking for.
Building Your Foundation for Abdominal CT Interpretation
Before you jump into a complex scan, you need a solid grasp of the basics. Think of it like learning the grammar of a new language. Without it, the images are just a jumble of black, white, and gray shapes. Nail these core concepts first, and the whole process becomes much more intuitive.
And make no mistake, this is a powerful tool. Research has shown that getting an abdominopelvic CT scan dramatically changed the leading clinical diagnosis in 49% of patients. On top of that, it boosted physician diagnostic certainty from 70.5% before the scan all the way to 92.2% after. That’s a huge leap, and it shows just how critical this modality is in modern medicine.
Decoding Tissue Density with Hounsfield Units
Every single pixel on a CT has a specific shade of gray that corresponds to its radiodensity, which we measure in Hounsfield Units (HU). This isn't just a bit of trivia; it's a practical tool you'll use constantly to figure out what you're looking at.
The scale is simple, standardized with water right at 0 HU. Anything denser than water gets a positive number, and anything less dense gets a negative one.
- Air: Looks jet black (around -1000 HU). You'll see this in the lungs and scattered throughout the bowel.
- Fat: Shows up as dark gray (around -100 to -50 HU). This is your baseline dark tissue you'll see everywhere in the abdomen.
- Fluid/Soft Tissue: Appears as light gray (around +10 to +80 HU). This includes organs like the liver and spleen, plus fluid in the bladder or simple cysts.
- Bone/Calcification: Shines bright white (anything over +150 HU). This is obvious in the spine and ribs, but you'll also see it with kidney stones or vascular calcifications.
This scale lets you differentiate structures at a glance. For instance, a low-density, perfectly round circle in the kidney is probably just a simple cyst (fluid), while a tiny, high-density speck could be a calcification or stone. Getting these fundamental terms down is crucial, and reviewing a good medical terminology study guide can really help lock in the vocabulary.
Understanding Contrast Phases and Why They Matter
For most abdominal issues, intravenous (IV) contrast is a game-changer. The timing of the scan after we inject the contrast creates different "phases," and each one is optimized to highlight specific structures right when they're getting the most blood flow.
For board exams and your rotations, knowing when to use each phase is just as important as knowing what to look for. The clinical question always dictates the protocol.
Here are the three key phases you absolutely must know for your exams.
- Non-Contrast: This is your baseline, taken before any IV contrast goes in. It’s perfect for spotting things that contrast might hide, like calcifications (think kidney stones) or acute hemorrhage.
- Arterial Phase: This scan is timed to catch the moment arteries are at their brightest, which is about 20-35 seconds after injection. This is your go-to for finding an active arterial bleed, mapping out vascular anatomy, or characterizing tumors that get a rich arterial supply, like hepatocellular carcinoma.
- Portal Venous Phase: Timed at 60-80 seconds post-injection, this is the workhorse of abdominal CT. It gives the best enhancement of solid organs like the liver, spleen, and pancreas, making it ideal for finding most tumors, abscesses, or inflammatory changes.
To make this even clearer, here’s a quick-reference table that connects the clinical question to the right contrast phase—super high-yield for exams.
Abdominal CT Contrast Phases Key Uses for Board Exams
| Contrast Phase | Timing Post-Injection | Primary Use Case (High-Yield) | Example Pathology |
|---|---|---|---|
| Non-Contrast | Pre-contrast | Detect calcifications, acute hemorrhage | Kidney stones (nephrolithiasis), adrenal hemorrhage |
| Arterial | 20-35 seconds | Detect active arterial bleeding, hypervascular tumors | GI bleed, hepatocellular carcinoma (HCC), renal cell carcinoma (RCC) |
| Portal Venous | 60-80 seconds | General solid organ evaluation, detect hypovascular lesions | Liver metastases, pancreatic adenocarcinoma, diverticulitis, appendicitis |
Knowing which phase to look at based on the patient's story is a skill that separates the novices from the pros. If you suspect a GI bleed, you need that arterial phase. If you're hunting for liver mets, the portal venous phase is your money shot. This is the kind of clinical correlation that scores points on exams and helps patients in the real world.
Developing a Systematic Search Pattern
Let's be honest: the single most common way to miss a finding on an abdominal CT is by not having a system. When you're staring down a complex scan during an exam or on a chaotic rotation, it's incredibly easy to spot the most obvious pathology, feel a sense of relief, and completely miss something else hiding in plain sight. Your best defense? A repeatable, systematic search pattern.
Think of it like a pilot's pre-flight checklist. You go through the same steps, in the same order, every single time. This isn't about being robotic; it's about building muscle memory. The goal is to make the process so automatic that you couldn't skip a structure even if you tried.
Starting From the Top Down
The most intuitive way to build your system is to follow the anatomy. Always scroll from the top of the scan (the lung bases) all the way down to the bottom (the pelvis). As you move, you'll methodically tick off each organ system.
This top-to-bottom scroll gives you the full picture. You'll catch pathologies that straddle the chest and abdomen, like a sneaky basilar pneumonia or a pleural effusion causing referred abdominal pain. This kind of disciplined approach is vital across all imaging—in fact, a structured method is just as critical for learning how to interpret chest x-rays to avoid common errors.
Solid Organs: Your First Pass
Your first major checkpoint should be the solid abdominal organs. These are the big, well-defined players that are usually easy to spot. For each one, you're assessing its size, shape, density, and how it enhances with contrast.
- Liver and Biliary System: Start in the right upper quadrant. Is the liver huge, or is it shrunken and nodular like in cirrhosis? Look at its density—is it darker than usual (suggesting fatty infiltration)? Then trace the gallbladder. Is the wall thickened? Anything over 3 mm should make you think cholecystitis. Check for bright, white gallstones.
- Spleen: Now swing over to the left upper quadrant. The spleen should look smooth and be a bit less bright than the liver in the portal venous phase. Is it enlarged (splenomegaly)? In a trauma case, are there any lacerations? Look for any focal dark spots, which could be infarcts or even abscesses.
- Pancreas: This one’s a bit trickier, tucked away in the retroperitoneum right behind the stomach. The key here is to look for inflammation, which shows up as hazy, gray fat stranding around the pancreas. A swollen, poorly enhancing pancreas is the classic look for pancreatitis.
- Kidneys and Adrenals: Check both kidneys. Are they the same size? Look for hydronephrosis (a dilated, fluid-filled collecting system), masses, or scarring on the cortex. And don't forget to glance at the adrenal glands sitting on top. They should be thin, V- or Y-shaped structures, not big and lumpy.
The biggest trap here is 'satisfaction of search.' You spot obvious pancreatitis and stop looking. But what if there's also a small liver lesion? Sticking to your system forces you to check every organ, every single time, preventing this common mistake.
This diagram helps visualize the different contrast phases that are so important for evaluating these organs.
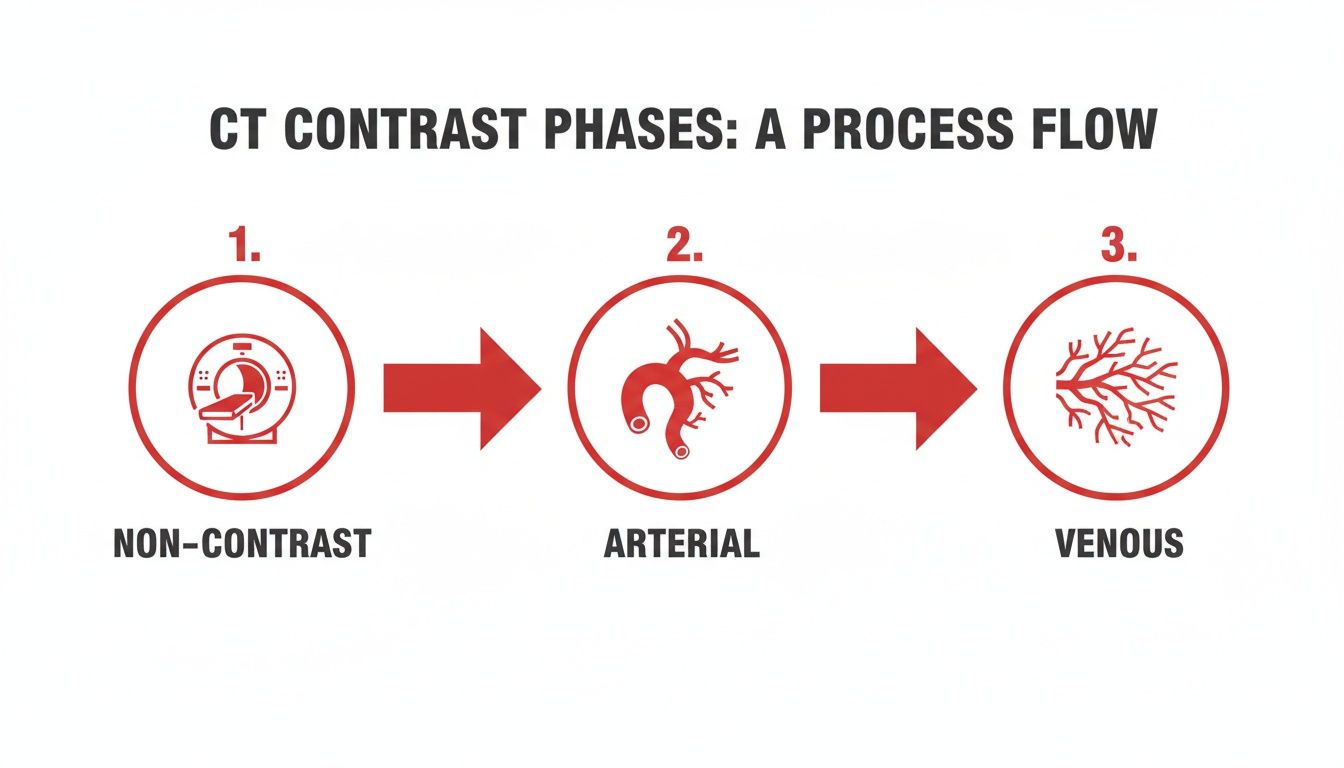
It clarifies how the timing of the scan after contrast injection highlights different structures, which is fundamental to your systematic review.
Tracing the Gastrointestinal Tract
Once you've cleared the solid organs, it's time to follow the bowel from start to finish. This takes patience, but it's where you'll find a huge number of high-yield diagnoses.
You literally trace the tube. Start at the gastroesophageal junction, follow the stomach, loop through the duodenum, wind through the small bowel, and then follow the entire colon down to the rectum.
Here’s what to look for on your GI tour:
- Wall Thickness: The bowel wall should be paper-thin, usually <3 mm. Thickened walls scream inflammation or ischemia.
- Bowel Caliber: Is the small bowel dilated? Generally, >3 cm is abnormal. What about the large bowel? >6 cm is the magic number. Dilation points to an obstruction, so your next job is to find the "transition point" where it goes from dilated to collapsed.
- Surrounding Fat: The fat around the bowel should be clean and black. If it looks hazy, gray, and stranded, that's a major sign of inflammation. Fat stranding in the right lower quadrant is appendicitis until proven otherwise. In the left lower quadrant? Think diverticulitis.
- Air and Fluid Levels: Seeing multiple air-fluid levels, especially in the small bowel, is another classic sign of a bowel obstruction.
For example, on an exam question about a patient with right lower quadrant pain, you'd systematically trace the bowel down to the cecum. If you find a blind-ending tube with a thick wall, surrounding fat stranding, and maybe a little white speck of an appendicolith—you’ve just confidently diagnosed appendicitis.
Assessing Vasculature and the Retroperitoneum
The final zones in your search are the major blood vessels and the spaces behind the peritoneum. It's easy to blow past these, but they can harbor life-threatening problems.
Checking the Major Vessels
Start with the aorta and scroll down its entire length. Is it aneurysmal (dilated)? Can you see an intimal flap suggesting a dissection? Then look at the main branches:
- Celiac Artery
- Superior Mesenteric Artery (SMA)
- Renal Arteries
- Inferior Mesenteric Artery (IMA)
Next, check the big veins like the Inferior Vena Cava (IVC) and the portal vein. The key finding here is thrombosis—a dark filling defect (clot) inside an otherwise bright, contrast-filled vessel. Portal vein thrombosis is a dreaded complication of things like cirrhosis and pancreatitis.
Inspecting the Retroperitoneum
This is the space behind the abdominal lining where the kidneys, adrenals, pancreas, big vessels, and psoas muscles live. It's a classic hiding spot for subtle pathology.
Look for abnormal fluid collections, which could be blood or an abscess. If the edge of a psoas muscle looks hazy and indistinct, especially in a patient with a fever, you could be looking at a psoas abscess. Finally, scan for enlarged lymph nodes (lymphadenopathy). Any node over 1 cm in its short-axis diameter is generally considered abnormal.
Having a system forces you to consciously look in these "hidden" spaces so you don't miss these critical findings.
Recognizing High-Yield Pathologies and Classic Signs
Okay, you've got your systematic approach down. Now for the fun part—spotting the classic findings that show up time and again on exams. We're moving beyond normal anatomy and into the bread-and-butter of abdominal pathology.
Think of these as visual patterns. Once you learn to recognize them, your differential diagnosis immediately shrinks, pointing you straight toward the right answer. This is where you really start to read scans like a pro.

A quick note: nearly all of these classic signs are best appreciated with IV contrast. The difference between a scan with and without contrast can be staggering. One study found that unenhanced CT was roughly 30% less accurate than contrast-enhanced CT. For experienced radiologists, the rate of missing the primary diagnosis skyrocketed to 38% on non-contrast scans, compared to just 8% with contrast. This in-depth comparison of CT scan accuracy really drives home how vital contrast is for spotting subtle disease.
Spotting Inflammatory Processes
Inflammation is probably one of the most common things you'll diagnose on an abdominal CT. Your number one sign to burn into your memory is fat stranding. It looks like a hazy, streaky, gray mess in the normally pure black abdominal fat. See that? Your detective work has just begun.
Your job is to find the source of the fire.
- Appendicitis: See fat stranding clustered in the right lower quadrant? Your eyes should immediately go hunting for the appendix. Look for a dilated, blind-ending tube (thicker than 6 mm) with a puffy, enhancing wall. Bonus points if you spot a tiny, bright white appendicolith.
- Diverticulitis: Find the same inflammatory changes but over in the left lower quadrant, usually around the sigmoid colon? That’s the classic spot for diverticulitis. You'll see little outpouchings (diverticula) from the colon wall surrounded by that tell-tale fat stranding and mural thickening.
- Pancreatitis: Is the inflammation concentrated in the upper mid-abdomen, seemingly hugging the pancreas? You've likely found pancreatitis. The pancreas itself might look swollen, indistinct, and just generally unhappy.
Recognizing Bowel Obstruction and Ischemia
Nailing a bowel obstruction is a core skill. You're looking for one thing: a "transition point." This is the exact spot where dilated, fluid-filled loops of bowel suddenly become decompressed or collapsed. Find that point, and you've found the site of the obstruction.
Another high-yield bowel issue is ischemia—when the bowel isn't getting enough blood. On CT, this can produce a classic sign called thumbprinting. This refers to the segmental, nodular thickening of the bowel wall that literally looks like someone pressed their thumb into it. It's caused by swelling and bleeding within the bowel wall (submucosal edema and hemorrhage).
Clinical Vignette Example: An elderly patient with a history of atrial fibrillation presents with sudden, severe abdominal pain that is "out of proportion to the physical exam." On CT, you see thickening of the small bowel wall and a dark filling defect in the superior mesenteric artery. This combination is the textbook presentation for acute mesenteric ischemia.
Identifying Malignancy and Trauma
Certain cancers have classic appearances on CT that are favorite exam questions. One of the most famous is the apple core lesion of colon cancer. This describes a short segment of the colon with such severe, concentric wall thickening that it chokes the lumen, resembling a partially eaten apple.
In the liver, metastases often show up as multiple, round, dark (hypodense) lesions on the portal venous phase. But be careful—their appearance can vary wildly depending on where the primary cancer started.
Trauma is another area where CT is king. In a blunt trauma case, your systematic review is everything.
- Solid Organ Injury: Scan the liver and spleen for lacerations, which look like dark, linear lines cutting through the organ. Also, look for surrounding high-density fluid—that’s active bleeding (hemoperitoneum).
- Bowel and Mesenteric Injury: This can be tricky. Look for bowel wall thickening, abnormal enhancement patterns, or free fluid where it shouldn't be. But the most critical finding is free air.
- Pneumoperitoneum (Free Air): Finding tiny specks of black air floating outside the bowel is a surgical emergency. It means a perforated viscus. Don't confuse this with normal gas inside the bowel loops. Free air defies gravity and collects in the highest parts of the abdomen, often seen just under the diaphragm or behind the anterior abdominal wall.
High-Yield Abdominal CT Signs and Associated Pathologies
To help you lock in these high-yield findings, here’s a quick-reference table connecting the classic radiological sign to its most likely cause. This is pure gold for last-minute exam prep.
| Radiological Sign | Description | Classic Associated Pathology |
|---|---|---|
| Fat Stranding | Hazy, streaky, increased density of intra-abdominal fat. | Appendicitis, Diverticulitis, Pancreatitis |
| Apple Core Lesion | A short segment of concentric, circumferential bowel wall thickening. | Colon Cancer |
| Thumbprinting | Nodular, segmental thickening of the bowel wall. | Ischemic Colitis |
| Pneumoperitoneum | Pockets of air outside the bowel lumen, typically in non-dependent areas. | Perforated Viscus (e.g., ulcer, diverticulitis) |
| Transition Point | A location where dilated bowel abruptly becomes decompressed. | Small or Large Bowel Obstruction |
By training your eyes to spot these patterns and connecting them to the clinical vignette in a test question, you can slice through the fluff and arrive at the right diagnosis with confidence. This skill is exactly what separates the novices from the experts.
Avoiding Common Pitfalls and Interpretation Traps
Knowing the classic signs of disease is a massive step, but the real test of your skill is spotting the subtle findings and sidestepping the common traps that trip up even seasoned clinicians. These pitfalls are everywhere on abdominal CTs, and learning to anticipate them is what separates a good read from a great one.
One of the most dangerous habits you can develop is satisfaction of search. This is that little voice in your head that tells you to stop looking once you've found the first, most obvious abnormality. You spot a glaringly obvious appendicitis, feel that rush of diagnostic certainty, and move on—completely missing a subtle liver lesion or an incidental renal mass that could be just as critical for the patient.
There's only one cure for satisfaction of search: unwavering discipline. You must force yourself to complete your full systematic review on every single scan, no matter what you find early on.
Navigating Notorious Problem Areas
Let's be honest—some parts of the abdomen are just plain harder to evaluate. These anatomical minefields are where diagnostic errors love to hide. The biliary system, for instance, is a well-known trap. Its small structures and subtle signs demand a focused, careful inspection that's easy to rush through when you're busy.
Research backs this up. One study looking at interpretation errors among junior physicians found the biliary tract was the toughest area to get right, with an accuracy rate of only 71.6%. Think about that—nearly a third of biliary cases were misinterpreted, flagging this as a huge area for focused learning. You can dig into the details of these common CT interpretation challenges yourself to see just how important expertise here is.
Distinguishing Pathological Mimics
Another major trap is mistaking a benign, normal variant for something sinister, or vice versa. The abdomen is full of "look-alikes" that require you to look closer, check the Hounsfield units, and consider the entire clinical picture.
Here are a few classic mimics you absolutely have to know:
- Renal Cysts vs. Masses: A simple renal cyst should be perfectly round with a paper-thin wall, filled with dark, water-density fluid (around 0-20 HU). The second you see a renal lesion with a thick, irregular wall, internal septations, or areas that light up with contrast, your alarm bells for renal cell carcinoma should be ringing.
- Physiologic Bowel Thickening vs. Colitis: Sometimes, a segment of bowel looks transiently thickened just because it's collapsed and not fully distended. Real colitis, on the other hand, will show more persistent, circumferential thickening, often with tell-tale signs like surrounding fat stranding and mucosal hyperenhancement.
- Post-Operative Changes vs. Abscess: A patient who just had surgery will have some inflammation, small fluid collections, and even pockets of air. That's expected. The key is differentiating these normal post-op findings from a brewing abscess, which typically looks like a well-defined, rim-enhancing fluid collection.
To steer clear of these traps, always correlate your imaging findings with the patient's history and labs. Is that "thickened" bowel in a patient with explosive diarrhea, or is it an asymptomatic finding? Does that post-op fluid collection line up with a new fever and a rising white count? Context is everything. Consciously thinking about these mimics and problem areas will sharpen your analytical skills and build the confidence you need for an accurate read.
Putting It All Together with Real-World Cases
Alright, theory will only take you so far. The real learning happens when you start applying this systematic approach to actual patient scans. This is where you connect the dots between the textbook pictures and the messy reality of clinical medicine, building a strong differential diagnosis by weaving the patient's story into the imaging findings.
Let's walk through a couple of high-yield scenarios just like you'll see on your exams and rotations. We'll start with a classic clinical vignette, break down the key images, and then pull it all together into a sharp, concise summary.

This kind of hands-on practice is where confidence is built. It’s one thing to know what fat stranding looks like in a lecture slide, but it’s a totally different ballgame to confidently call appendicitis under pressure. The more cases you see, the faster your brain gets at spotting the patterns.
Case One: The Classic RLQ Pain
You get a call about a 22-year-old male in the ED with a one-day history of migrating abdominal pain. It started around his belly button but has now settled in the right lower quadrant. He’s got a low-grade fever and a white count of 14,000/mm³.
You pull up the CT and immediately launch into your systematic search. You quickly confirm the solid organs look fine and the bowel isn't obstructed. But as you trace the colon down toward the cecum, you find exactly what you're looking for.
- Key Finding: There's a dilated, blind-ending tube measuring 9 mm across, coming right off the base of the cecum.
- Key Finding: The wall of this tube is thick and lights up brightly with contrast.
- Key Finding: The fat all around it is hazy and gray—classic fat stranding that screams inflammation.
- Important Negative: You double-check for free air or an abscess, and thankfully, there's none.
With these classic features—a dilated appendix, wall thickening, and periappendiceal fat stranding—the diagnosis is acute, uncomplicated appendicitis. When you present this on rounds, you want to be clear and direct: "The CT demonstrates findings consistent with acute appendicitis, evidenced by a dilated 9 mm appendix with mural enhancement and surrounding inflammatory changes."
Case Two: The Sudden, Severe Abdominal Pain
Next up is an 82-year-old woman with a history of atrial fibrillation who presents with sudden, excruciating, diffuse abdominal pain. Here's the kicker: on physical exam, her abdomen is soft. Her pain is completely out of proportion to the exam findings, which should set off immediate alarm bells.
Given the sudden onset, you jump straight to the arterial phase images. You run through your systematic review of the organs and bowel, noting some diffuse thickening of the small bowel walls.
But the money shot is in the vasculature.
- Key Finding: You spot a dark, non-enhancing filling defect sitting right in the proximal superior mesenteric artery (SMA).
- Key Finding: Multiple loops of small bowel downstream are thickened and barely enhancing.
- Key Finding: You see some small pockets of gas inside the bowel wall itself (pneumatosis intestinalis). This is a very bad sign.
The combination of an SMA clot and downstream bowel changes is the textbook presentation for acute mesenteric ischemia. This is a surgical emergency with a sky-high mortality rate, making it a true "can't miss" diagnosis.
Your report needs to convey urgency: "The CT shows an occlusive thrombus in the proximal SMA resulting in acute mesenteric ischemia, with concerning signs of bowel wall pneumatosis indicating infarction." This kind of focused practice is exactly what prepares you for the high-stakes environment of clinical rotations. Learning to handle these situations is a core part of succeeding in your medical student clerkships.
Working through cases like these trains your eyes to do more than just see findings; it teaches you to interpret them in the context of the patient in front of you. You learn to filter out the noise, zero in on the critical clues, and communicate your conclusions effectively—the fundamental skills of any great physician.
Questions That Always Come Up for Med Students
When you're starting out, every abdominal CT feels like a puzzle. Certain questions pop up over and over again on rotations and while you're grinding through exam prep. Here are some quick, high-yield answers to clear things up.
How Can I Quickly Tell Small Bowel from Large Bowel?
The fastest way to get your bearings is to look at two things: location and wall markings. The large bowel usually creates a "frame" around the abdomen, while the small bowel loops are more centrally located.
But the most reliable sign? That comes down to the wall markings.
- Large Bowel: You're looking for haustra. These are thick, chunky folds that do not cross the full diameter of the bowel.
- Small Bowel: Here, you'll see valvulae conniventes (also called plicae circulares). These are much finer, more delicate lines that run across the entire lumen.
If you spot haustra, you can be confident you're looking at the colon. It's a dead giveaway.
What Are the Must-Not-Miss Findings on a Non-Contrast CT?
When you don't have IV contrast, your search list gets a lot shorter but the stakes are just as high. For boards, there are three absolute emergencies you cannot afford to miss on a non-con scan.
First, scan for calcifications, which show up as bright white spots. Think kidney stones. Second, hunt for pneumoperitoneum (free air), which tells you there’s a perforated bowel—a surgical emergency. Finally, look for acute hemorrhage. This will appear as high-density (bright) fluid, often hiding out in the retroperitoneum.
While contrast is key for most detailed workups, missing one of these three on a non-contrast study is a major league error. They all scream "call a surgeon, now!"
As you move through your clinical years, you'll see more tech integrated into the workflow. For instance, AI tools like the Suki AI clinical assistant are becoming common for helping docs with charting and administrative tasks during busy patient encounters.
What Exactly Is Fat Stranding?
Think of fat stranding as the CT scan's number one sign of inflammation.
Normal abdominal fat should look clean and uniformly dark. When something nearby gets inflamed, that fat becomes hazy, streaky, and gray. That’s fat stranding. It's a non-specific sign, so your real job is to play detective and find the cause.
See it in the right lower quadrant? Suspect appendicitis. In the left lower quadrant? Think diverticulitis. If it’s wrapped around the pancreas, you're looking at pancreatitis. The location of the stranding points you directly to the problem.
At Ace Med Boards, we specialize in breaking down complex topics like reading abdominal CTs into concepts you can actually master for your exams. Our expert tutors provide personalized, one-on-one guidance to help you crush the USMLE, COMLEX, and Shelf exams. Start with a free consultation and see how we can help you hit your target score. Visit us at https://acemedboards.com to learn more.